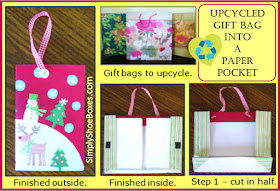
I had some gift bags that I wanted to upcycle for my Operation Christmas Child shoeboxes as the bright colors could really brighten the box for a child. I remember a missionary telling our family that she collected the fronts of cards in America to give to the children in Chad, Africa because the surroundings were so dull there and that the families enjoyed using them as artwork to hang on their
walls. So I always try to include brightly colored artwork in my boxes in some form.
I was able to get a case of printer paper at Office Max free after Maxperks and I am always looking for creative ways to include some in my boxes. Whether for school work or artwork (I always include crayons, markers or colored pencils) I think they will enjoy it. So here is a simple method I created to tuck some partial sheets into some of the boxes.
The size of the gift bag will determine the size of the paper inside. Be sure that the gift bag you have folded in half will fit in the shoebox you will be using or you will need to cut it down more and make new folds. I will give details in the directions. I also used some magnets on the inside to hold it closed; velcro could be used, instead. I left the handle in place--makes a nice added touch.
I think these could come in handy at home, too. Hang one up by the handle on a hook near the phone or on the fridge--tuck a pen inside and you will be note ready. A small one could be tucked into a purse or diaper bag or even in the glove compartment of a car.
Supplies:
- gift bag
- magnets (I like to upcycle the advertisement magnets I get--but you can buy rolls of stick-on magnets) or Velcro
- scissors
- glue (like Elmer's)
- printer paper
Instructions:
- Open gift bag.
- Cut down center fold down sides and across the bottom.
- If there is a piece of cardboard in the bottom remove it.
- Cut across the bottom of each side.
- Fold the sides to the inside.
- Cut the bottom 1/2" from the fold.
- Cut diagonally across each corner of the bottom--in the bag in my illustration above the part I cut way was actually a separate piece from what I wanted cut away so I just tore it off, but I do not have others in front of me to see if all gift bags are made the same.
- Fold the bottom up and fold bag in half vertically to make pocket--crease fold well.
- Open back up.
- Glue the bottom to the bottom of each side--making sure not to use too much glue thus gluing it shut so no paper fits in the flaps.
- Cut pieces of magnets approximately 1/2" x 1" (the heavier and larger the bag the larger it will need to be to keep it closed). You could also use Velcro pieces instead.
- Glue one magnet on each inside flap--making sure to line them up.
- Let dry.
- Cut paper approximately 1/2" shorter and 1/2" narrower than finished pocket. The narrower the paper is cut in comparison to the pocket the more paper will fit in. I cut mine a little larger and I only put in about 12 pieces on each side.
- Fold in half and you are ready to tuck it into a shoebox.
Dollar Tree is a Simply Shoeboxes' affiliate partner.
If the bag is larger be sure it will fit in your shoebox before you finish it. Fold the bag in half lightly to test the width and length. Follow the same instructions above but just cut it down some after cutting it in half and make new folds.
Check free-cycle places for free gift bags.
You may like to check out our other Upcycling Craft Posts that are good to include in an Operation Christmas Child shoebox.


Such a fun idea! I'm always seeing people give away gift bags on Freecycle. Now, I'm going to snatch them up for this project. By the way, the site looks great. Looking forward to all it brings to OCC.
ReplyDeletePerhaps you could glue down those giveaway business card magnets (cut into pieces)?
ReplyDeleteYes, that is what I was trying to convey, but didn't do too good a job :-) .
ReplyDeleteA similar way to make a folder to hold paper is to make mini school folders using 12 x 12 card stock. Fold the bottom up about 2". Fold in half the other direction. Now you have a little folder with a 2" tall inner flap where the paper will be placed on each side. To get more paper into the folder, cut away 1/4" pc of the center fold of the 2" flap--look at a school folder & you'll see what I'm trying to explain. Glue, staple or use tape to adhere the 2" edges to the long sides. Now add paper: cut 8 1/2" x 11" paper in half -- it's a perfect fit. You can make a craft folder by using colored and printed scrapbook paper. This gives kids a great variety of paper to craft with. If you put paper dolls in your box, the child can make paper doll clothes from the scrapbook prints.
ReplyDeleteGreat ideas Linda! Thanks for sharing!
ReplyDelete