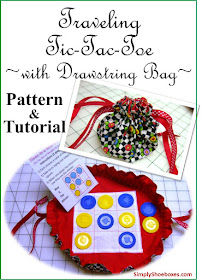
Finding reasonably priced quality toys for my Operation Christmas Child shoe box gifts is becoming harder and harder each year. I am on a quest to craft my own. This Travel Tic-Tac-Toe Game is the first I have designed. On the "how to play" instruction sheet I am calling it Three In A Row. It may make more sense to children in other countries -- either with limited English or when translated. I put
poker chips on my Christmas wish list because I have had this design in my mind for several months.
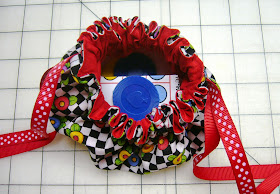
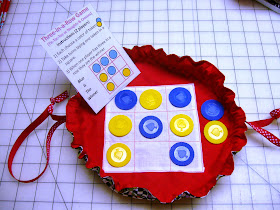
Instead of making a board and a drawstring bag, I made it all in one. It can be opened all the way out
and laid flat to play on. When drawn up it holds the tokens and the instruction sheet.
Supplies Needed:
- 1" to 1 1/2" Tokens -- 5 of each color
- Ideas: buttons, poker chips, large flat beads, cardboard circles, sewn fabric circles
- 12 x 13" square outside fabric
- 12" square lining fabric
- 5 3/4" square solid color fabric
- 2 -- 45" long approx. 3/8" wide Drawstrings
- Ideas: crocheted chains, ribbon, sewn, shoe laces, rope, sewn from fabric
- Colored thread

- Fold under 1/4" on all edges of solid color square and press.
- Set aside.
- Cut outside fabric into two 6 1/2" x 12" squares.
- With right sides together and using a 1/2" seam allowance sew along one 12" edge as follows: stitch for 1/2" stop; leave 3/4" unstitched and begin stitching again -- stitch to within 1 1/4" of top edge and stop; leave 3/4" unstitched and stitch the remaining 1/2" to the top.
- Be sure to back stitch at all beginnings and endings.
- Press seam open.
Leave open between pins when stitching--both ends. - Stitch around openings left in seam (stitched in black below).
- Fold piece into four and pin to hold even.
- Mark from corner out 6" every 1/2" or so and connect to make an arc. Cut along marking.
- Alternative method: use a 12" dinner plate to draw a circle on unfolded piece.
- Open out to form circle
If you look closely you can see the purple line. - Use this circle to cut your lining piece.
- Center the solid color square onto the lining piece.
- Stitch close to edges.
- Mark your grid lines evenly apart on the solid square (or use a stitching guide on your machine). They will be approximately 1 3/4" apart.
- Stitch in contrasting color.
- Be sure to backstitch at ends or pull threads to back and tie so they do not come undone.
- With right sides together pin lining to outside.
- Stitch using 1/4" seam allowances leaving open 2" to 3" for turning.
I use two pins at the points I want to stop sewing (see top of image). - Turn right side out and press, pressing under the seam allowance on the opening.
- Stitch close to upper edge.
- Stitch around again right below the openings left in the outside seam--in red below (this will form your casing).
- Thread drawstrings thru casing -- begin with one at one end, go thru casing, come out the second opening and go back in thru the other side. Both ends of one drawstring will be coming out the same opening.
- Begin the other drawstring at the other opening and repeat.
- Tie the ends of each drawstring to itself. If using ribbon be sure to finish the edge with Fray Check or burn them with a lighter.
- Pull both drawstrings at once and it will draw up into a tiny pouch to hold the instructions and tokens.
- Pull it open and either make it lay completely flat or leave a little edge around it like shown here to help keep tokens from falling off.
Designs often work out better in my mind and on paper than when executed. I love how this turned out except that the drawstrings have to be so long that they look extra long when drawn--but they can easily be carried over the child's shoulder which is a plus. And it draws up nice and small to fit in a shoe box!
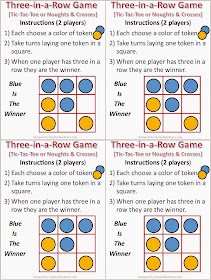
How to Play Instruction Sheet
Here is the instruction sheet I made to add with the game. I made it so four could fit on one sheet of printer paper. You are welcome to use this in any games you make for yourself or gifts for others or your shoe boxes.
 We have posted several other games to craft for Operation Christmas Child shoeboxes. You can find some in the links below:
And over at Threading My Way there is an ongoing link party where others share toys they've made and often include a pattern or tutorial.
And you can find all of our craft tutorials thru this link: Crafting for Operation Christmas Child Index.


What a wonderful idea! Thanks for providing all of us "non-crafters" such great, detailed instructions! You are a blessing!
ReplyDeleteThank you for your kind words and you are welcome.
ReplyDeleteRobin said it all. Thank you.
ReplyDeleteThank you, Jackie! I love to hear others enjoying my postings. Keeps me going.
ReplyDeleteWhat a wonderful idea, Cheryl!!! I love how the drawstring bag opens right up- stops the need for boxed corners, with the game itself giving structure to the bottom of the bag. A very clever design and yet, so simple!!!
ReplyDeleteFeatured today, Cheryl...
ReplyDeleteThank you for your wonderful compliment, Pam. And thanks for featuring it at Threading My Way. Hope many enjoy it -- I think it would be great for mom's to have in their purse for little ones waiting at the doctors.
ReplyDeleteLove this idea not to mention it's beautiful as well. The grab and go feature would seem to encourage clean-up by the child as well. I can think of some other activities that could work here. Maybe a large circle with some roads for a little car or doll city? Pinning your idea for later.
ReplyDeleteThanks, Joy, little cars would be fun! Hope you enjoy it!
ReplyDeleteWhat a fantastic idea!
ReplyDeleteGreat tutorial!
ReplyDeleteI used flat glass floral stones from Dollar Tree for my markers.
ReplyDelete