We use a lot of handmade drawstring bags in our Operation Christmas Child shoeboxes and I am always looking for an easier way to sew them so I can go faster and make more (especially since I need to make them for our own shoeboxes and the kids' packing party at church). This is my newest version: a lined drawstring pouch just the right size for pencils and other small school supplies or to hold the hygiene supplies we include (soap, washcloth, toothbrush, comb, etc.). I've decided to share my Simple Drawstring Bag Pattern and Tutorial
here in case anyone else is interested in making some.
What I like about this pattern is it is quick to make (I can make one in about 20 minutes, faster if doing it production line style) and with it being lined it is sturdier and the raw edges do not need to be finished because they are enclosed. I try to make my shoebox gifts extra sturdy as the child may never have another one and may use it for years.
 |
| Fits perfectly in an OCC GO box. |
Drawstring Bag Instructions (these instructions are for pencil pouch size, but it can be made any size)
Back-stitch at the beginning and end of all stitching.
Step 1: Cut fabric as follows [for pieced ones piece your scraps together before cutting to size]:
- Main fabric: cut 1 (one) piece 11" x 11"
- Lining fabric: cut 1 (one) piece 11" x 11"
- Drawstring casing fabric: cut 4 (four) pieces 5 1/2" x 4"
 |
| Step 1 cut fabrics. |
Step 2: With right sides together stitch the two short ends of two of the drawstring casing pieces using 1/4" seams. Repeat with other two pieces. Turn right side out and press.
 |
| Step 2 right sides together. |
 |
| Step 2 stitch with 1/4" seam. |
 |
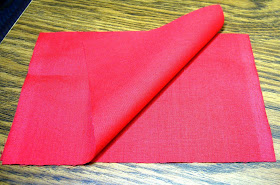
| Step 3 press casing in half and press. |
Step 4: While matching raw edges pin the casing pieces onto top edge of the main fabric piece with edges 1/2" from unfinished side edges of the main fabric piece. This will leave approximately 1/4" between the two pieces in the center of the main fabric piece.
 |
| Step 4 pin casings to main fabric. |
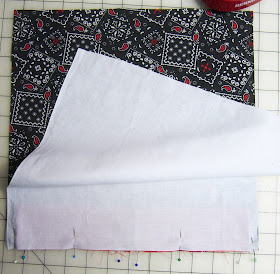
Step 5: With right side facing main fabric and matching raw edges pin lining fabric on top of casings -- sandwiching them all together.
 |
| Step 5 pin lining over casings. |
 |
| Step 5 casings sandwiched between lining and main fabric. |
Step 6: Stitch seam using a 3/8" seam allowance.
 |
| Step 6 stitch along top with 3/8" seam allowance. |
Step 7: Lay pieces open and press seam well.
 |
| Step 7 press top seam. |
Step 8: With main fabric and lining pieces still open fold in half with right sides together.
 |
| Step 8 fold in half lengthwise. |
Step 9: Pin around the edges leaving about 3" along bottom edge of the lining fabric unpinned. Stitch all of the pinned edges using a 1/4" seam allowance (be sure to leave the 3" space un-sewn -- this is where you will turn it). Also, be sure to take only 1/4" seam allowance so the casings do not get caught in the seam.
 |
| Step 9 pin and stitch around outside edges leaving 3" opening in bottom of lining. |
Step 10: Clip corners at a diagonal.
 |
| Step 10 clip corners diagonally. |
Step 11: Turn right side out thru 3" hole in lining. Fold under 1/4" seam allowance in opening and pin. Stitch closed (use any method you prefer; I top-stitched mine).
 |
| Step 11 turn bag right side out; pin and stitch opening. |
Step 12: Fold lining to inside and press to inside.
 |
| Step 12 turn lining to inside and press. |
Step 13: For added strength top-stitch along top edge of bag about 1/8" from seam. This will also help hold the lining to the inside.
 |
| Step 13 top-stitch near top edge of main fabric. |
Step 14: Top-stitch 3/4" from top of each casing piece. Depending on the size of your drawstring (if you don't make one as shown below) you can change the width of the opening by stitching closer or farther from the top edge. The opening closest to the bag will be used for the drawstrings.
 |
| Step 14 top-stitch 3/4" from top edge of casings. |
Drawstring Instructions
Step 1: Cut 2 (two) pieces of fabric 1 1/4" x 18" each
 |
| Step 1 cut two drawstring pieces. |
Step 2: Press under 1/2" on each end of each piece.
 |
| Step 2 press under ends. |
Step 3: Press in half lengthwise with wrong sides together.
 |
| Step 3 press in half length-wise. |
Step 4: Open it back out and press one long, unfinished edge towards the center fold line. Repeat with the other side.
 |
| Step 4 fold edges towards center fold line. |
Step 5: Re-fold it in half and press firmly.
 |
| Step 5 refold and press firmly. |
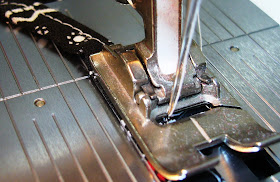
Step 6: Stitch close to the long opened end. Note: Because it is so narrow I had to move my needle to the far left position so the feed dogs would pull it thru while it stitched.
 |
| Step 6 stitch close to edge on drawstring. |
Step 7: Thread drawstrings thru bottom opening in casing by using a large safety pin -- begin at one end, go thru casing, come out the other end and go in thru the second casing. Both ends of one drawstring will be coming out the same side of the bag. Begin the other drawstring at the opening at the other side of the bag and repeat. Tie the ends of each drawstring together. (Note: click this link for an illustrated instruction if needed - Drawstring Bag Pattern to Hold an OCC Shoebox [scroll to near the bottom of the post]. Pull the strings at the same time and the bag will close at the top.
 |
| Step 7 add drawstrings, tie ends and pull up to draw top of bag. |
Some other drawstring options:
 |
| Here are some made with small scraps pieced together. |
We have other drawstring bag patterns and tutorials here at Simply Shoe Boxes--sewn and crocheted. If you are interested in checking them out click on the links below.
- 3-Step, Five Minute Drawstring Tote Bag from Bandannas or Towels
- Simple Drawstring Tote-bag to Hold a Shoe Box
- Three Small Drawstring Bags from One Fat Quarter
- Simple Drawstring Bag ~ From Upholstery Sample
- Crochet Front Post Coin Purse, Jewelry Bag and Pencil Pouch Instructions
- Crochet Shell Pattern Coin (Change) Purse
- Simple Crocheted Stand-up, Drawstring Bag
You can also find inspiration and tutorials for more drawstring bags at Threading My Way's ongoing linky party.
 |
| 50 Made and ready to fill for our church kids' Operation Christmas Child packing party. |


This is a new way to sew the casings to the top of the bag. I like it! Took some notes and will give this a try with my OCC bags (shoe box size) this year. Great tute and pics!!
ReplyDeleteSoap on sale -- if you live near a Family Dollar store, they have Ivory soap priced 2 packs for $5 this week. A pack is 8 full-size bars of soap, so you'll get 16 bars for $5. That's the best price I've found where I live.
ReplyDeleteThanks so much for taking the time to post the instructions. I have been making 12 a day and love them. Question, we are having a packing party at church and plan on having these available, 400 goal!! Should I have them prepacked or let the, lay flat in the boxes?? Thanks for any suggestions.
ReplyDeleteHi Sandy! Glad to hear you're enjoying them! I feel they may take up a little less room flat in the bottom, but some cultures it's rude to give an empty bag. And with a packing party of 400, I'd probably lean towards pre-packing them to make it easier for those unfamiliar with OCC and assure everything you want gets in. That's what I'm doing for the kid's packing party at my church. You can see what I packed in them here: https://youtu.be/lEoGTT_pdgo
ReplyDelete~Sarah for Simply Shoeboxes
Thanks Sarah, I think packing them I'll help our lines move faster too.
ReplyDeleteIs there a step missing between steps 3 ad 4? I am a beginner sewer and this was really confusing.
ReplyDeleteOn the casing for the ribbon, are edge on the sides raw? Your do not look like raw edges, but mine turned out that way. Am ding something wrong? There seems to be something missing between steps 3 and 4.
ReplyDeleteGladys, I think the issue may actually be in Step 2. If you're just following the photo instructions and not reading all the text with the instructions, you may have missed where it said, "Step 2: With right sides together stitch the two short ends of two of the drawstring casing pieces using 1/4" seams. Repeat with other two pieces. TURN RIGHT SIDE OUT AND PRESS." (caps for emphasis as I can't do underline or bold here-not yelling :) ) That's how the side edges aren't raw-hence steps 3 & 4 use "raw edges" in directions as the short edges aren't raw anymore.
ReplyDelete